After watching the prices of LCD monitor drop this last year I had the
idea of using a wide screen monitor in portrait mode with PinMAME but
I wasn't the only one.
Unfortunately not all the pieces necessary to run PinMAME are not open
source only the actual emulation of the HW in the pinball machine is
open source the rest is not. So getting support for a version of
PinMAME like Ultrapin that works well in portrait mode is not the
easiest thing to set up. But some people
have done
it.
Another idea I had was to use the 3-D display trick using the Wii
remote that
Jonny Chung Leedemonstrated
to create a fully 3-D depth pinball table surface using the full
portrait display. But again I wasn't the first to think of this as many
of the folks from Future
Pinball
forums have asked for this feature to be added to that pinball
simulator but I
suspect it will find it's way into a commercial system before it will
available elsewhere. The Wii remote accelerometer sensors could also
handle the table shake which is so important with ball
handling
in a real pinball machine.
But that's OK. If someone can do it I can do it too or will be able to
do soon.
First up I need a couple LCD monitors. I bought two more from New Egg
again, picked up a 19" and 28" Hanns-G and set them out on the table to
see how they would look. Now I need to take some dimensions so I can
create a design that I can use the CNC machine to make.
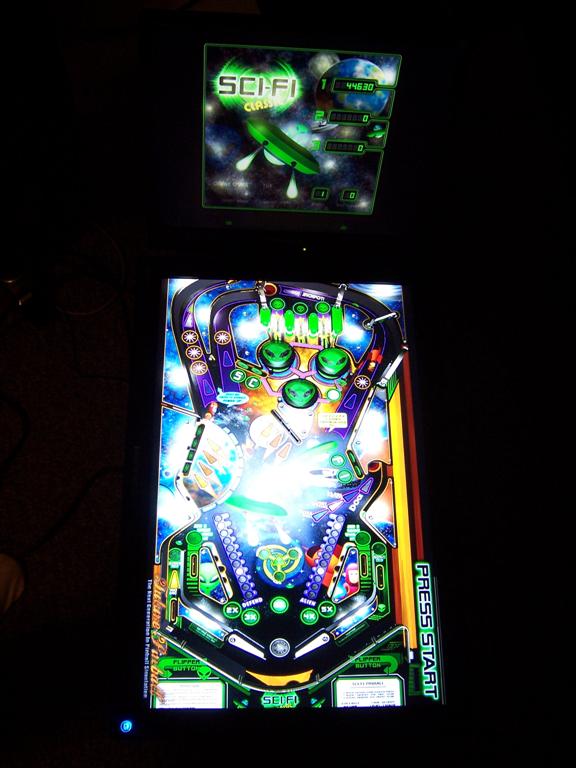
Here is a quick test of the setup running Future Pinball Alien Table.
It seems that the program does not like multiple rotation setting or
resolution setting on different monitors but I finally found a
configuration that seemed to work well.
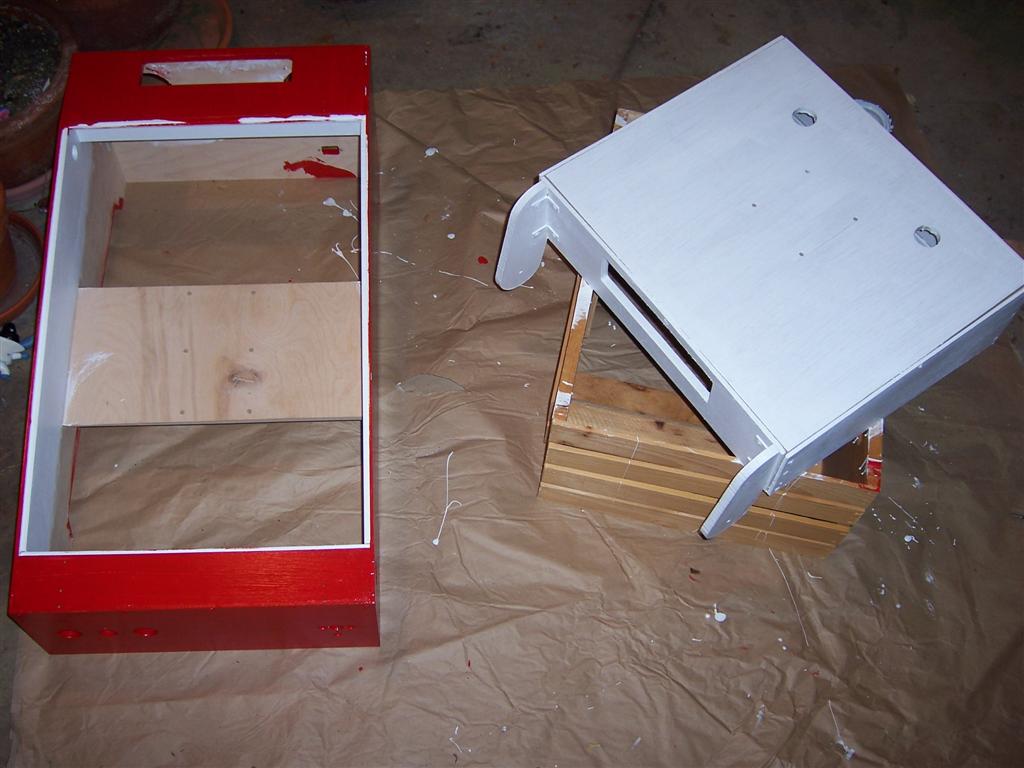
Spent some of the Memorial Day weekend learning a CAD program. This is
the first pass at the design, it has about 20 pieces and still needs a
couple more but I think it will look pretty good in the end. The
backdrop will fold down over the table for transport and access just
like a real pinball machine. It has a footprint of about 36x20 inches
and is about 30 inches high.
I think I've finished the design, no interference issues and all the
parts are there and look like they line up correctly. I also was able
to calculate the swing arm dimensions for proper motion when up or down.
Got the layout to fit on one 4.0 x 5.5 foot sheet but with little room
to spare. Probably need to do the first one in pieces.
Actually I've noticed I missed one of the seventeen pieces, can you
guess which one?
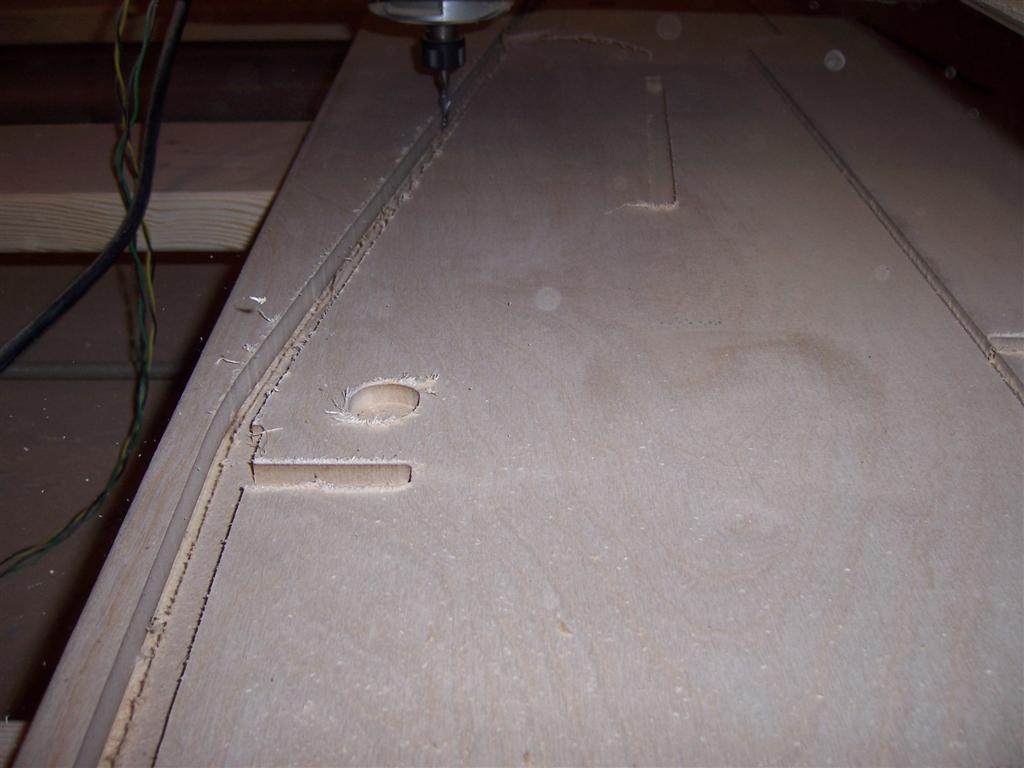
Here
are some images of the first sheet I cut out. I decided to use 2 x 4
foot plywood boards because I need a car with a roof rack or I need to
buy a pickup truck because I cannot get anything bigger to fit in my
car. This first sheet took 2 hours and 20 minutes. I can cut at 20
inches per minute and I was only cutting 1/8 inch at a time.
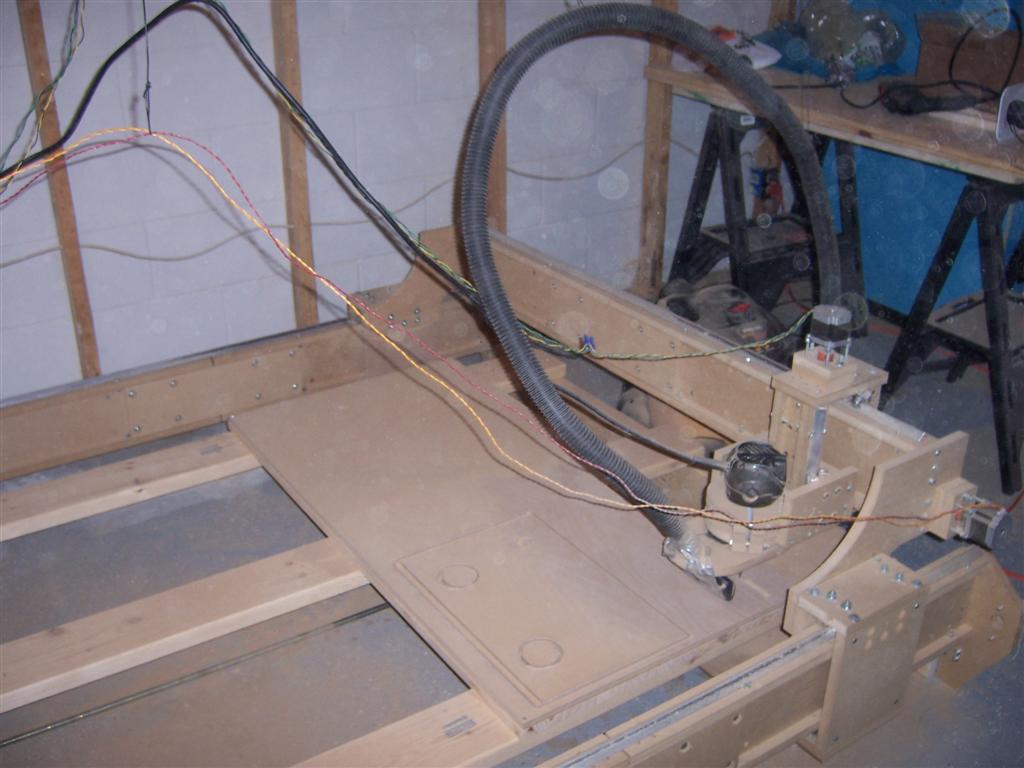
For
the next sheet I switched to 1/4 inch at a time and that cut the
time down to 1 hour and 20 minutes for second sheet which was a bit
more
reasonable. I also rigged the wires and vacuum with some wires on hooks
from the ceiling. That way I was able to run more or less unattended,
or at least be able to run to the bathroom for a second.
The
X and Y position is accurate but the Z position was not. It varied
because the boards were not completely flat. I screwed down the corners
but apparently that was not enough. So, since my design called for
quite a few interlocking corners which were a bit wonky with the
different depths I had some difficulty assembling it. I was finally
able to coax the corners together with some screws but I definitely
need to reconsider that design aspect for any future projects. Maybe I
should just cut them manually on the bench. I now understand why
Patrick designed the CNC machine the way he did to eliminate the need
for accurate depth cutting. On a smaller piece it should be possible to
do things accurately but on a bigger sheet it become difficult. Also it
is hard to zero the CNC machine to the top of the piece.
There
were a few minor casualties; I nicked the power cord once
and polished one of the table screws with router bit and
tripped
the circuit breaker once and one of the pieces was 1/4 inch too big and
man was it dusty but
I guess that's a good first run.I learned a lot about the process and
how to use my new CNC machine.
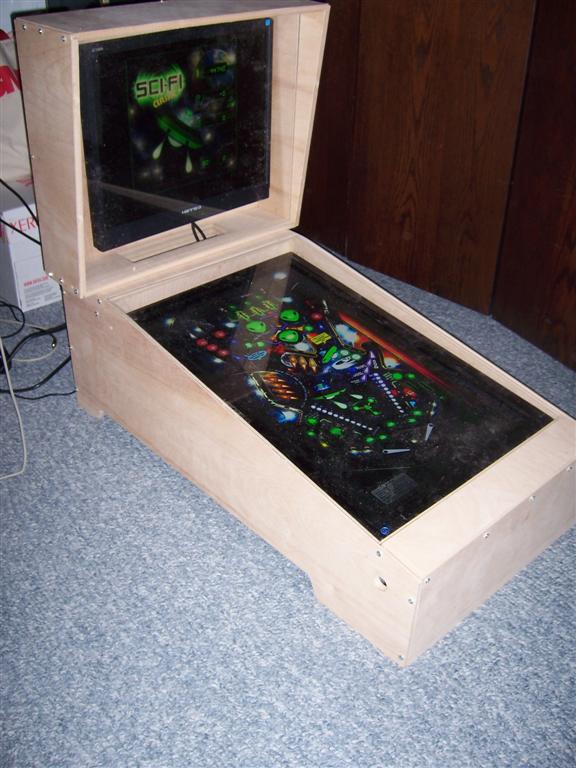
Here is the assembled pinball machine.
And with the side hinges attached.
And
with the top in the down position, there are definitely stress on the
arms with any side to side motion. I will need to be careful not to
stress that part too much and I will not be able to tip it on it side.
I will need to think about where the best place to stick the computer
inside so I can still have access to it and the monitors. I still have
the bottom board to cut out but that isn't really necessary right now.
The parts arrived while my family and I was away on vacation in France,
time to start wiring things up. I want to see if I can hook the pinball
shooter up to a optical mouse sensor so when the plunger is pulled on
the machine the plunger on screen also moves. I am using an iPac2 this
time around because I don't need nearly as many buttons, I may be able
to wire some of the buttons up to a nudge/tilt detector as well as
Future Pinball supports this. I still need to find a suitable
motherboard and video card that can drive both displays at once with
one of them rotated for the moment I am still using my spare PC as a
test platform.
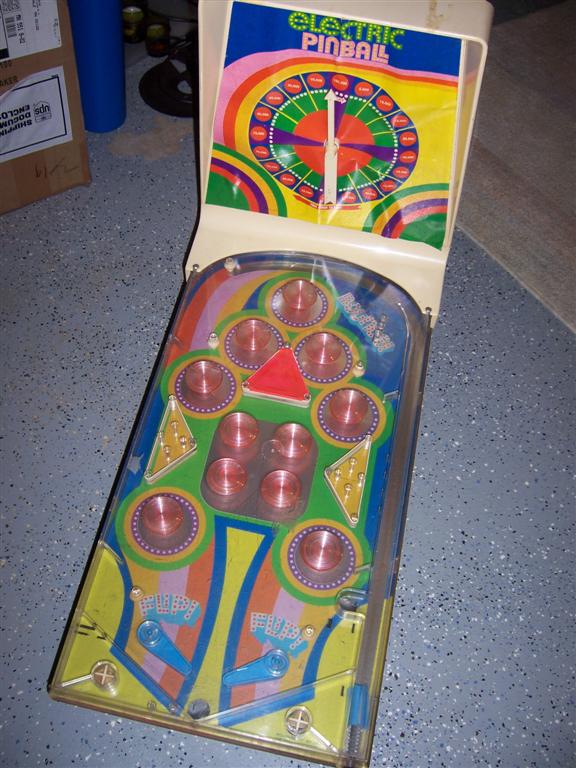
Here is probably the original inspiration for this project, my old
Sears catalog pinball machine I got when I was a kid. I found it in my
mom's basement. I cleaned it up a bit but parts of it need some repair
or replacement. Maybe after I finish I can get it working again. None
of the bumpers move but the spinner was triggered and advanced and rang
a bell when you struck a bumper.
Now that I have wiring and metal work figured out I can start painting.
Tomorrow I start a new day job as I quit my old last month. I probably
won't have as much time to work on fun projects like this but I will
try and finish this one at least. You will notice the addition of metal
brackets on the arms of the top part of the machine. I added these to
better secure the arms to the top as the screw mounted into the edge of
the arm were not very secure when the machine was assembled.
OK
painting is pretty much complete, it's very red, I need to let the
paint cure for a while before I start trying to put everything back
together so I don't damage the paint. The Plexiglass needs to be sanded a
bit because it doesn't fit so well after painting but I did set the
play field display in to see what it looked like. I'm not sure if I
should do details like adhesive vinyl artwork on the sides or not yet.
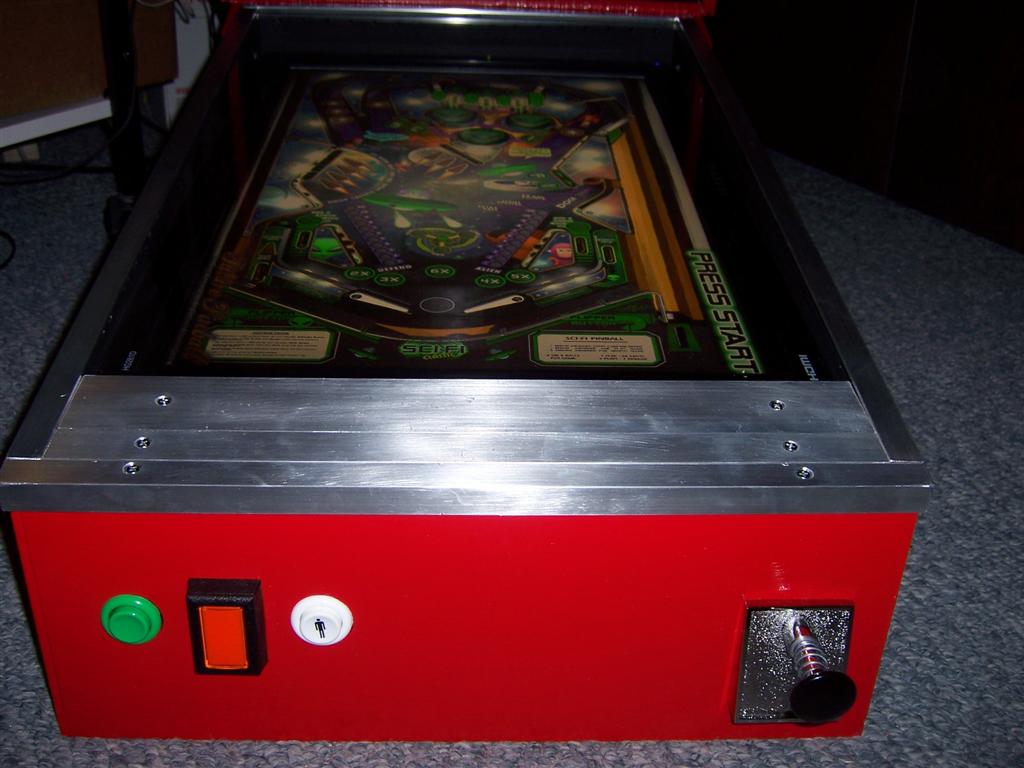
Installed
the shooter and the metalwork and glass. Had some trouble with assembly
because the metal sides need to be installed and screwed in before the
back panel but the back panel cannot be installed before the base
glass. After some effort I did find a sequence that would work. I
wished I could find a better sized piece of metal but this was the best
I could do to try and match the metal work on a real pinball machine.
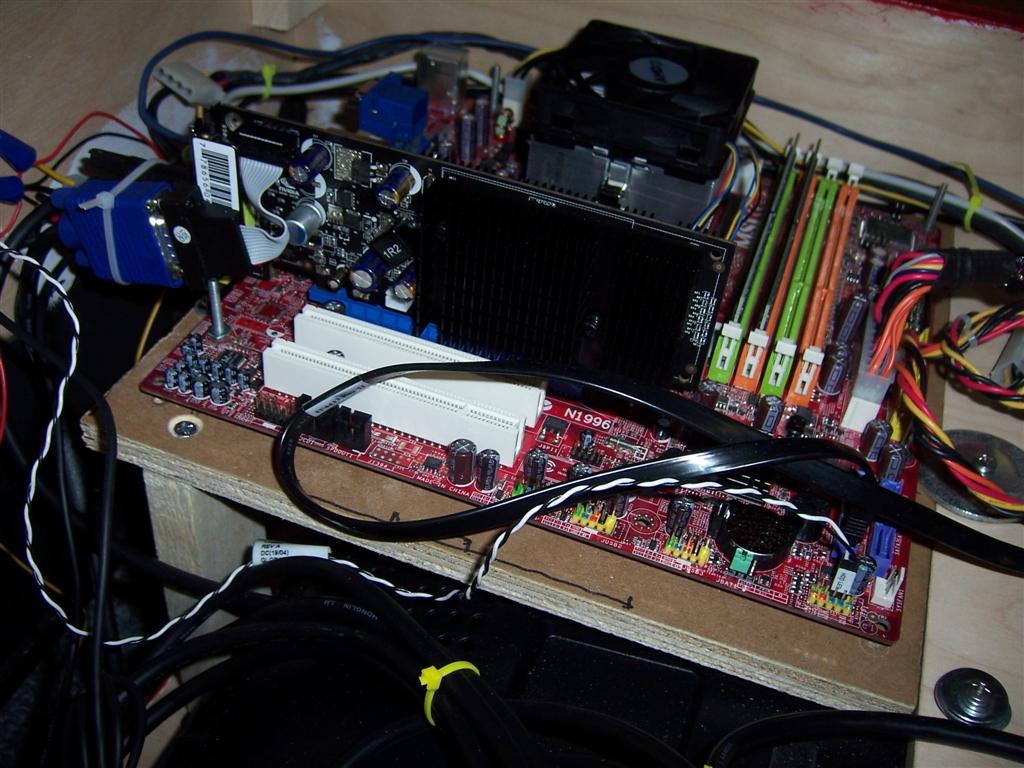
Still
need to install a PC motherboard inside as I still am just running the
wires outside to my test computer. Needs to be small and reasonably
fast with a good graphics card for 3D stuff. Also I need to install a
latch on the back to prevent the back from tilting forward when it's in
use. I may also need a few more buttons to control a front end
application for access to multiple pinball tables but all these things
can wait for another day.
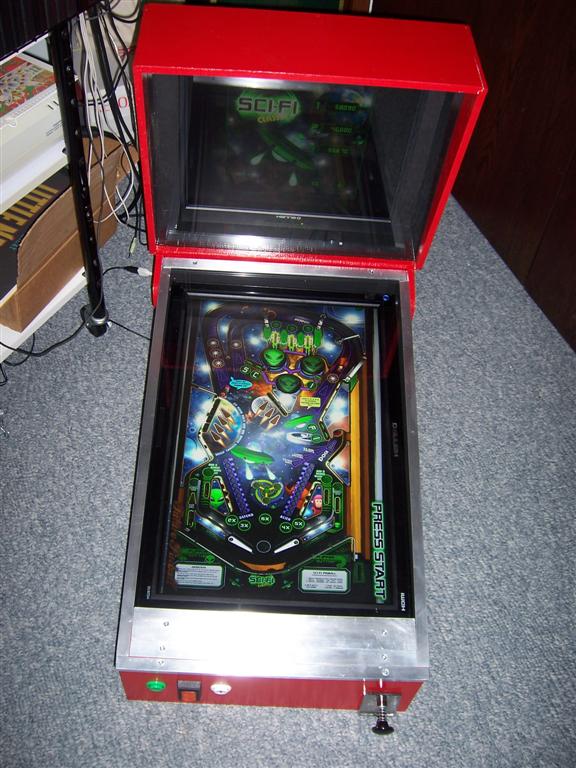
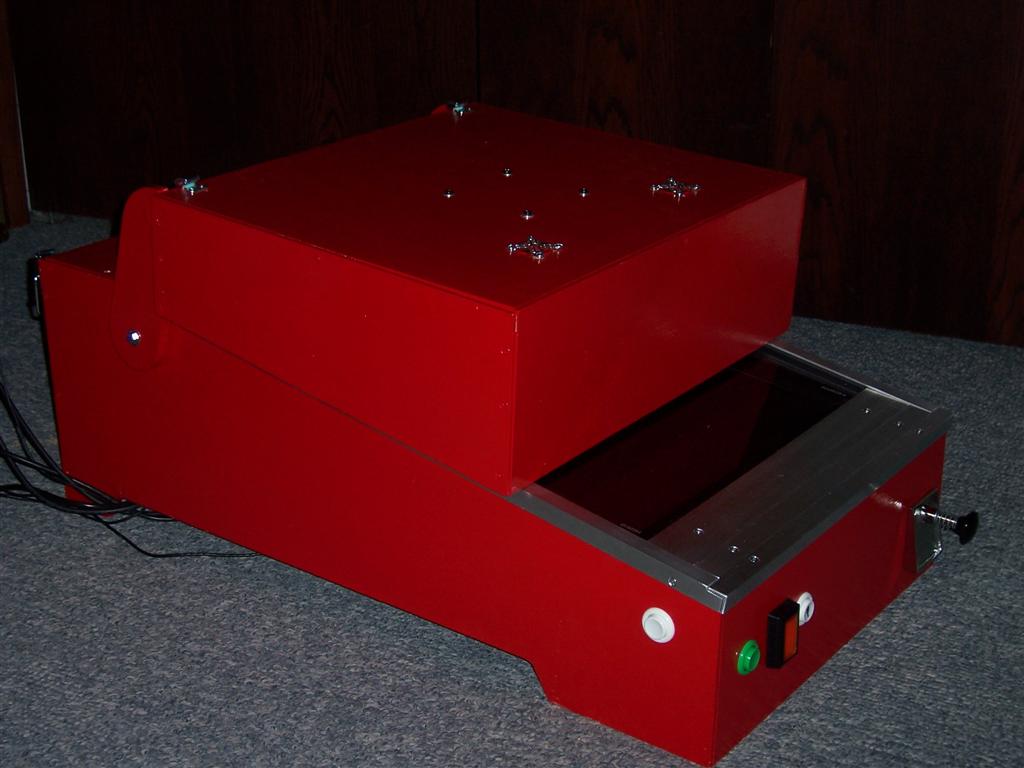
Another project success story.
Here it is with the top down.
And
a shot of the back with the top down. Originally I did not plan on
having the angle brackets and did not allow for the extra space when I
calculated the swing of the arm so it does not rest as flat as I
originally planned and the metal bracket digs into the top of the
machine and caused some dings. Lucky for me this is hidden when the
machine is being used.
I
really like the look of the back of the machine with the chrome fan
guards I salvaged for this purpose. Also note the latches I added to
secure the top of the machine when it's in use and more support for the
side arms. It's kind of important because the power enters the back of
the machine just below the opening and I don't want little hands inside
the machine while it is on.
OK,
here is the trackball electronics I removed from a salvaged trackball
and the cut strip of laser printed transparency with stripes printed on
it to simulate the spokes of the trackball wheel that normally
interrupt the LED and optical sensor connected to the shooter.
Unfortunately the electronics in the trackball are not fast enough to
sense the motion of the strip when the plunger is pulled and springs
forward at high speed. It works if you move it slowly but not fast
enough to work with the pinball shooter. I will need to investigate a
solution for this later.
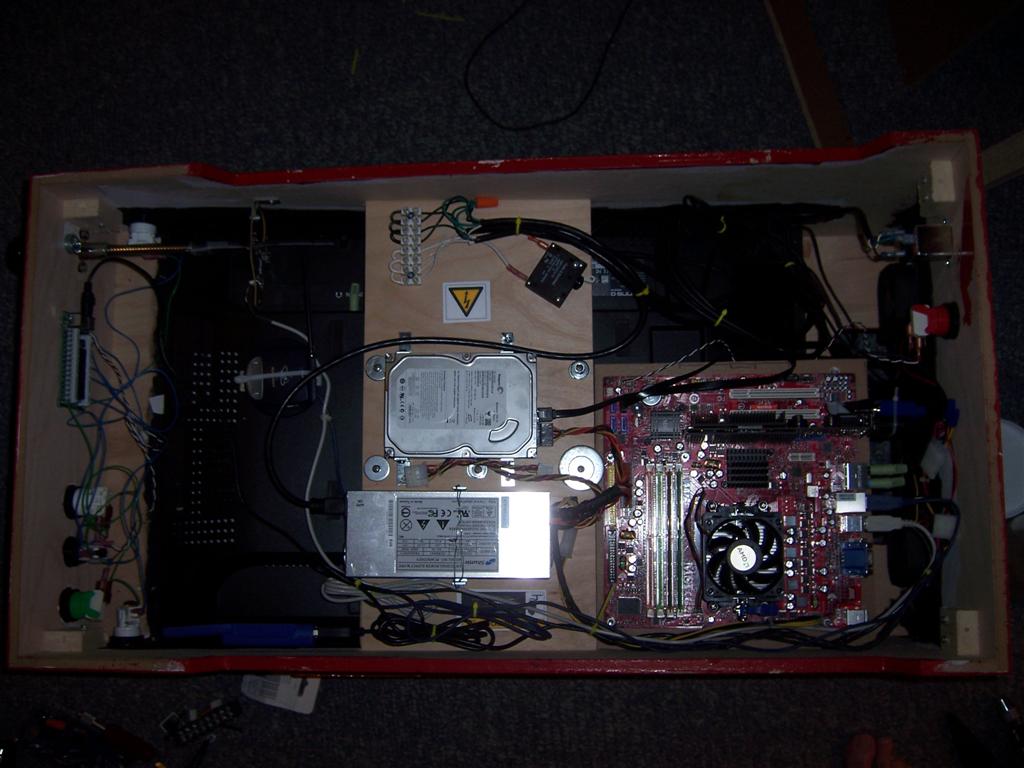
Here
I have put everything inside the cabinet sort of where I wanted things
to be mounted inside the machine. Hard drive, wireless USB network,
power supply, power distrubution, motherboard with video card attached,
etc.
And
here I have everything nicely mounted including the shooter with the
hacked USB mouse and a wireless keyboard and mouse receiver I dug out
of the junk box. The wireless receiver was old and I had to adjust some
of the electronics to get it working again as the radio was not tuning
correctly when I took it out of the box but it is working now. I would
also probably extend the play field monitor support to mount the
mother board on if I were to build another one but I didn't have all
the electronics at the time to see how it might fit so I did the
fitting later. If the video card had not been a low profile one I would
have had to flip the mother board over and mount it the other way. I
also installed another red button in the back of the machine next to
the power plug and connected it to the power jumper block on the
motherboard so you can turn on and off the machine from the back.
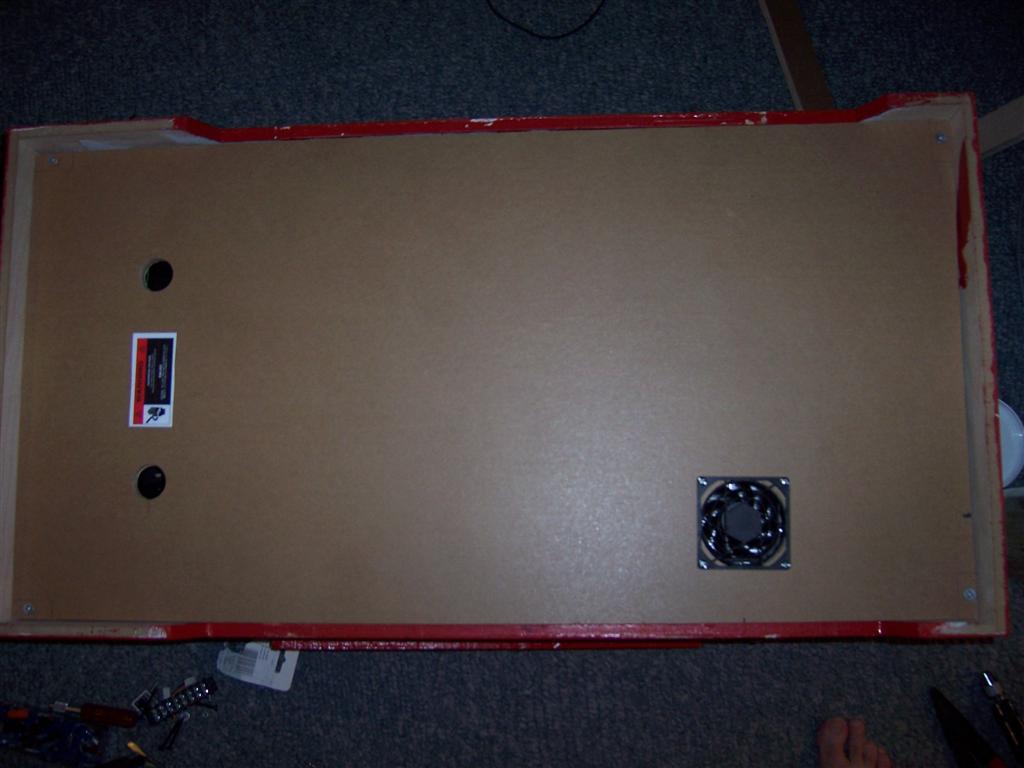
Finally
I added the bottom panel to protect everything with air vent holes for
intake and a hole for the processor fan to blow air out. The air hole
in front and in the top backside draw air in and the fans in the back
blow air out of the cabinet. Hopefully keeping both monitors and video
card cool. The processor is mounted very close to the bottom so I blows
air out directly out the bottom.
I
built a small two leg table to set the mother board on level with the
bottom and mounted it to the board. I also bent and cut off the back
metal piece on the video card and screwed it to the board for extra
support on the video card. I used a large washer to secure it on
the other side. Should make it easy to service if I need to in the
future.
Here is where I mounted the wireless keyboard receiver and the shooter assembly.
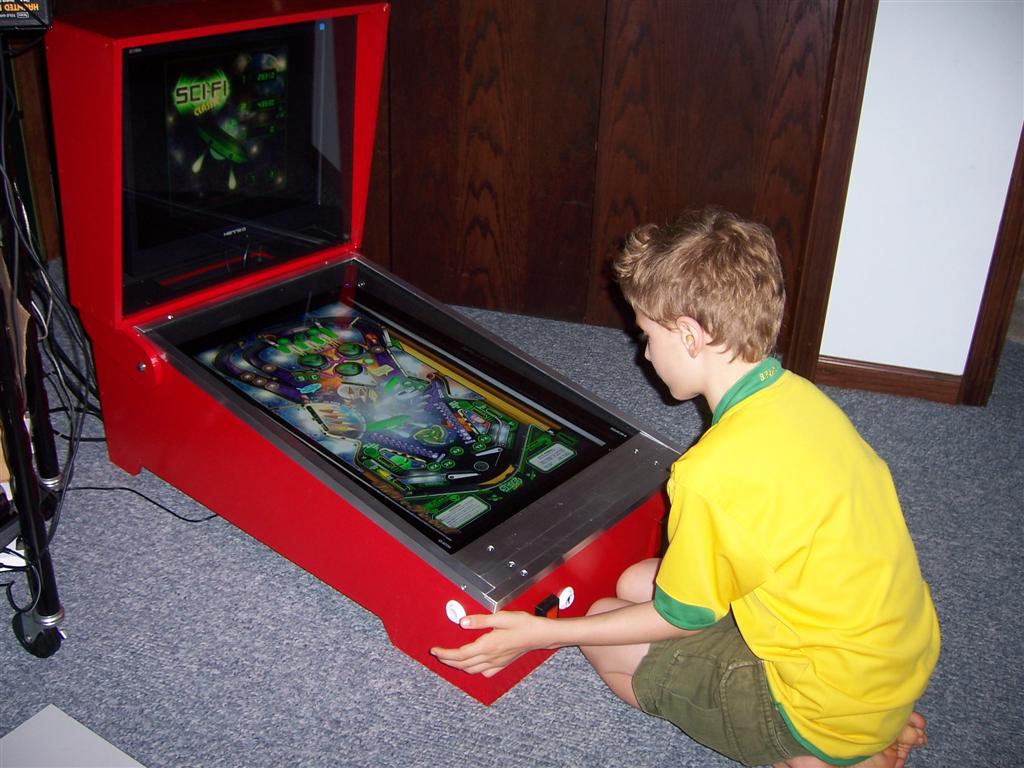
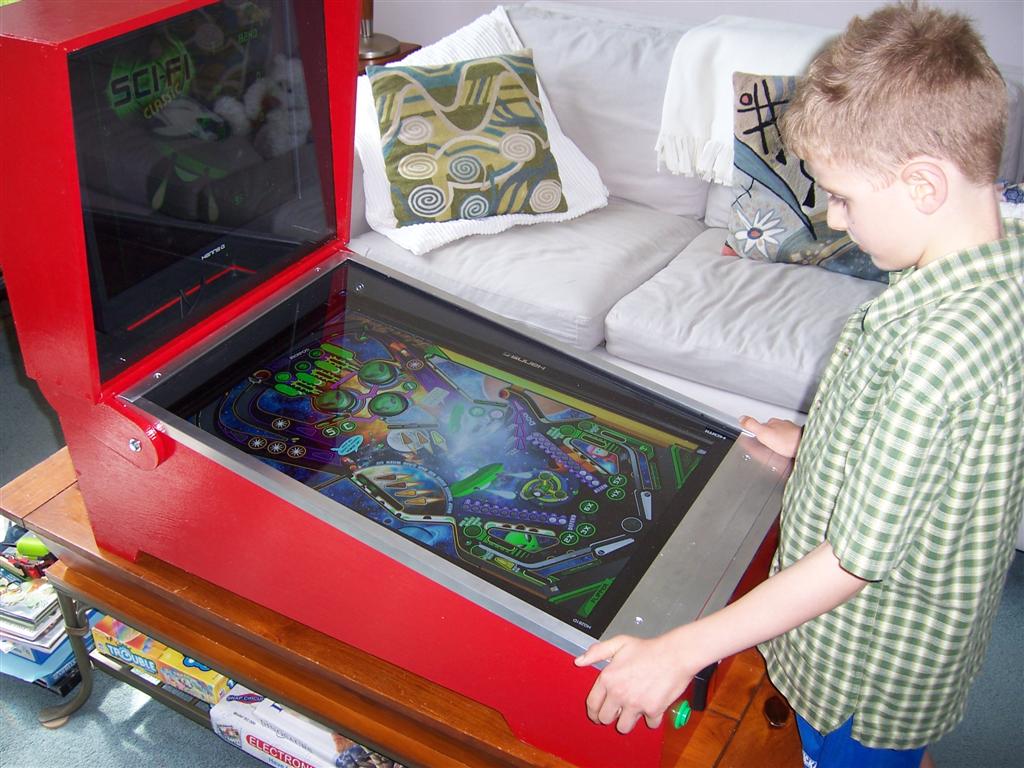
The finshed pinball machine in the living room for a little while the wife lets me. Setup of the Future Pinball
application can be a little tricky to get it to work on two screens and
have decent performance but with some effort you can get it to work.
You also need to manually rotate and position the table on the
playfield to get it in a top down view using the manual camera option
F11, you may also need to position the back panel using the numeric
keypad after pressing Scroll Lock. I am experimenting with autoit
to automatically adjust the camera at startup but am having mixed
success using the mouse motion scripting commands. For the moment I
have the system set to hibernate on power and restore so once I get the
machine setup it can be powered off and restarted without any user
interaction. There are also various front end applications that
automate the selection and launching of particular games. Setting up Visual Pinball and PinMAME also requires some extra effort.
Here is a somewhat complete parts list
for anyone thinking of building there own.
$40 3 sheets of 1/2" 2x4ft MDF board (bought at Menards) $12 1 sheet of 1/2" 2x4ft MDO board (bought at Menards) $20 1 sheet of 1/4" 2x4ft plexiglass (bought at fleet farm) $0 1 6 ft 1"x2" pine board (found in workshop) $0 1 80 GB SATA hard drive (salvaged) $0 1 wireless USB keyboard & mouse (salvaged) $0 1 low profile PC power supply (salvaged) $0 1 GeForce 8400GS low profile video card (found in junk box) $60 1 AMD CPU (bought from newegg) $50 1 motherboard (bought from newegg) $50 1 package of 2 1GB DDR2 memory sticks (bought from best buy) $550 1 HANNSG 28" LCD (bought from newegg) $170 1 HANNSG 19" LCD (bought from newegg) $40 1 Ipac2 (bought from ultimarc) $10 5 round arcade buttons ($2 each, bought from ultimarc) $8 1 rectangular lighted arcade button (bought from Happ) $18 1 pinball shooter assembly (bought from Happ) $0 1 PC power plug connector (salvaged) $0 1 PC power cable (salvaged) $7 1 pint white primer paint (bought at fleet farm) $7 1 pint red acrylic glossy paint (bought at fleet farm) $0 1 pint black matt paint (found on bench) $4 1 2 latch package (bought at Menards) $0 2 3" computer fans (salvaged) $0 2 small chrome fan covers (salvaged) $0 2 large chrome fan covers (salvaged) $0 1 spool green wire (found on bench) $0 1 spool blue wire (found on bench) $0 1 15 AMP breaker switch (salvaged) $0 1 power distribution block (salvaged) $0 1 bag of wire crimp connectors (found on bench) $0 3 electrical wire screw caps (found on bench) $0 1 bag of tie wraps (found on bench) $0 1 6 ft 1/2"x1/2"x1/8" aluminum angle (found in workshop) $10 1 3 ft 2"x1/8" aluminum (bought at fleet farm) $7 1 3 ft 1"x1/8" aluminum (bought at fleet farm) $0 1 bag of 3/4" wood screws (found on bench) $0 1 bag of 1" wood screws (found on bench) $3 6 1" machine screws for mounting playfield monitor ($0.50 each, bought at Menards) $0 2 motherboard header connector wires (salvaged) $0 1 warning sticker set (salvaged) $0 ? various salvaged screws, bolts, nuts and washers (found on bench) $3 3 sets 4 corner angle brackets ($1 each, bought at Menards) $0 1 USB mouse assebley (salvaged) $0 1 sheet of transparency film (found in printer) $10 1 USB wireless access point (bought from woot on 2 for tuesday deal)